The phosphate (Parkerized) finish on a military weapon is a durable coating and an excellent corrosion preventive. On World War II weapons it was an effective and inexpensive way to treat components churned out in the factories by the millions.
The phosphate coating is generally dark-grey in color, but won't prevent rust on its own. It has to be seasoned, like a cast-iron skillet. This means slathering every parkerized part of a firearm in grease and baking the finish in for several hours. After reading about the process on Xavier's blog I decided to do it to my Springfield Armory USGI .45 .
I've never detail-stripped a 1911 before, so I proceeded carefully. It's easy to lose these small components, especially with several small springs in the mix that can send parts skittering off into the ether. The good thing is that the 1911 was designed to be completely disassembled with tools available to the soldier-- a screwdriver, a punch, and the weapon's own firing pin. I plunked myself down at the kitchen table and I was off to the races!
First and foremost: All Weapons are Loaded. Treat them as such. Complacency in safe handling kills.

The chamber is clear. Now disassembly can begin in earnest:


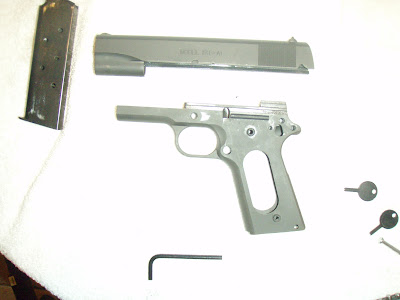
This is the field-stripped 1911. Normally this is as far as disassembly needs to go for cleaning. Every once in a while, perhaps every thousand rounds or so, it's good to do a detail strip and clean several parts that can accumulate gunk and oil in hard to reach spots. It's also wise to inspect the parts and make sure nothing's cracked, bent, or worn (especially the sear and the hammer.)

 Slide components: Firing pin, spring, extractor and firing pin stop. The extractor is caked in carbon deposits.

Almost done with the frame. Just have to nudge out the pins holding the hammer, sear and disconnector in place.

Stripped frame and slide after a generous dose of carburetor cleaner.

With a pile of tiny, easy-to-lose parts, a magnetic tool tray comes in exceptionally handy.
With the disassembly done, I slathered every part in Hoppe's gun grease and bunged the whole lot in an old toaster oven:

Satan's EZ Bake
I kept it low, about 250 degrees for three hours. Once all was done and cooled this was the end result, a hard coating of grease soaked into the finish:


Now it's all carbon and copper-free, properly lubricated and treated for deep south humidity. This baked in finish also gives it the patina of a vintage 1911, greased up and stored for years in an armory instead of fresh from the case at the gunshop.

2 comments:
That was friggin' COOL, bro! CLINK (beer mugs)...
Nice job and a good looking USGI 1911A1 you got there.
Post a Comment